
Do you know that 94% of Americans would recommend a company if they had “very good” customer support? Thus, if you use Zendesk then there is a feature called Zendesk views that allows you to display tickets and their resolution. It is created with the help of conditions and assists you in providing better customer support.
If you are in the market looking for steps to create Zendesk views, then you are at the right place. Here we have mentioned some easy steps that will help you enable the ticket view.
So, let’s dive in at check the content in this article:
- Top 5 Zendesk Views
- Benefits Of Zendesk Views
- Steps To Enable Zendesk Views
- Drawbacks Of Zendesk
- Meet Saufter, The Best Zendesk Alternative
Top 5 Zendesk Views
- Default views: These are the pre-set views that comes with Zendesk. Apart from the suspended and delete ticket view, you can edit or remove most of the views.
- Shared views: These views allow you to share ticket views with your agents. You can even create a group to limit the use of the views.
- Personal views: Created by an agent for their personal use. It can not be viewed by any other agent.
- Unassigned new and open tickets: This view will show you all the new incoming tickets that have been recently opened or are not assigned till now.
- Pending ticket: A very helpful view feature, it allows you to see all the tickets that have not been attended, and then you can take the necessary steps to resolve them.
Benefits Of Zendesk Views
There are 3 major benefits of creating a ticket view, let’s have a look at them:
- Build a knowledge base: You can track and keep these views which later can be used to create articles in the knowledge base. You can even use these views to keep a track of frequently asked questions and add them to your knowledge base.
- Improves productivity: With the help of a personal view feature, your agents can create canned responses and provide quick customer support. This increases their productivity and reduces the time taken to resolve a ticket.
- Train new agents: Zendesk views allow you to train new customer support agents by using solved tickets as an example. This ensures that the knowledge provided to the agents is crisp and insightful.
Steps To Enable Zendesk Views
There are 8 steps that you need to follow to enable Zendesk views.
- Step 1: Open Zendesk, navigate to Admin Center in the sidebar, and then select Agent tools>Views>Add View.
- Step 2: Enter a Title and Description for the view.
- Step 3: Now you need to select an option under the topic “Who has access” from the following: Any agent, Agents in specific groups, and Only you. This will help you determine who all can view the tickets.

- Step 4: Click Add condition and choose between Any or All conditions ( These conditions will define the collection of the tickets ).
- Step 5: Now you need to select Condition, Value, and Field Value for every new condition you add. You can click on Preview to test the conditions.
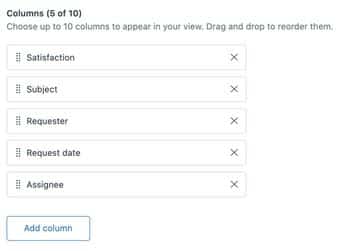
- Step 6: Select the formatting option by dragging the Columns into the order you want and then click on Add column ( you can add up to 10 columns )
- Step 7: After you have added the column, select Ascending or Descending under Group by.
- Step 8: At last, under Order by select Ascending or Descending to list the data and click on Save.
The view is created.
Drawbacks Of Zendesk
Zendesk Views Can Clutter Tickets
Zendesk does not have an organized way of showcasing views which can cause confusion among agents and especially to admin as they can check all the views. This can also cause issues when giving too many views to an individual.
Limited Public View
In the agent workspace there is an option to share views but it can be shared with 12 agents max. Which can be a limitation if you have a large customer support team.
Fewer Customization Options
The main Zendesk View is not very customizable, you need to create separate views to get your desired result. Additionally, the search option to look for a group of tickets isn’t great, you need to create separate views for that too.
Meet Saufer, The Best Zendesk Alternative

- Creating ticket view: Saufter has a friendly user interface that allows you to create views easily. The created views can also be customized as per your preference. Moreover, you get an unlimited ticketing feature as well.
- Customer support- With the assistance of Saufter’s AI chatbot you can automate your customer support and provide a quick resolution to your costumes’ queries. The bot can attend to your customers in real time and solve their queries using knowledge base articles.
- Order and return management: If you have an e-commerce store then Saufter provides 24X7 order and return management for your store. It even gives you access to your customers’ order and return history which allows you to reduce return abuse in your store.
- Call service: Thinking of providing extra support to customers via phone call? Saufter’s call services like a dedicated call center, after-hour call service, and more will assist you.
Conclusion
Now, in the end, we hope that through this article you were able to create Zendesk views and upscale your customer support. Although the process of creating views is a bit long and confusing, but that is the only way possible to create a Zendesk view.
However, if you are looking for software that allows you to easily create views, then you should try Saufter. Its user-friendly interface allows you to create and manage views easily.
So what are you waiting for?
Start your 15 days free trial now!


