Last Updated: July 2025
Are you planning to migrate from Freshdesk to Zendesk? Which involves complete customers, tickets, and companies data transfer from one helpdesk to the other. Then you will find this article useful to you. As we are discussing how to migrate from Freshdesk to Zendesk, here today.
How Do You Migrate From Freshdesk To Zendesk?
A Zendesk-authorized Help Desk Migration wizard is required to carry out this process. This wizard basically helps you to transfer customer service data from any helpdesk to Zendesk. With its out-of-the-box migration with custom field mapping, Help Desk Migration offers seamless data migration with all the ticket fields intact.
At this point, you may have a question on your mind. “Is all my data safe during this transfer?” Help Desk Migration gives top priority to data privacy on all projects, products, and services. They exercise required technical, organizational, and legal measures to ensure data security in place. It is GDPR and ISO/IEC 27001:2013 compliant and has the necessary certifications from PCI DSS. Read their detailed security and privacy policies to know more.
Now that, we know the Help Desk Migration wizard is required and is safe to use, let us move on to,
- Benefits Of Migration From Freshdesk To Zendesk
- Easy Steps To Migrate From Freshdesk To Zendesk
- Setbacks Of Migration From Freshdesk To Zendesk
- Meet Saufter, Best For Data Migration
Benefits Of Migration From Freshdesk To Zendesk
- Migrate objects – Migrate helpdesk objects like contacts, companies, etc., and knowledge base objects from Freshdesk to Zendesk easily.
- Automatic integration – With Helpdesk Migration, you can choose to migrate automatically without any coding skills. You simply need to follow the steps prompted by the Migration Wizard.
- Mapping Ticket fields – Map the ticket fields easily by clicking on the required fields that show up on both the source and the destination help desks. That is, on Freshdesk and Zendesk, both.
- Data migration customizations – Create customizations by including tags and images in tickets. If any graphical data takes a long time to migrate, then simply skip the attachments to speed up the process.
Easy Steps To Migrate From Freshdesk To Zendesk
There are two ways to migrate data from Freshdesk to Zendesk. One is using an automated migration solution powered by Help Desk Migration. It allows you to transfer data from and to Zendesk effortlessly. But if you have any complex data transfers to do, then you need to opt for the custom way.
Let us start with the automated migration method.
Automated Migration Method
Please note these important prerequisites before starting the data transfer.
- Register your account with Help Desk Migration. Sign up by creating new credentials or using any of your social login credentials from Google, Facebook, or LinkedIn.
- Save the access credentials – URL and API key of the target platform, ie: Zendesk.
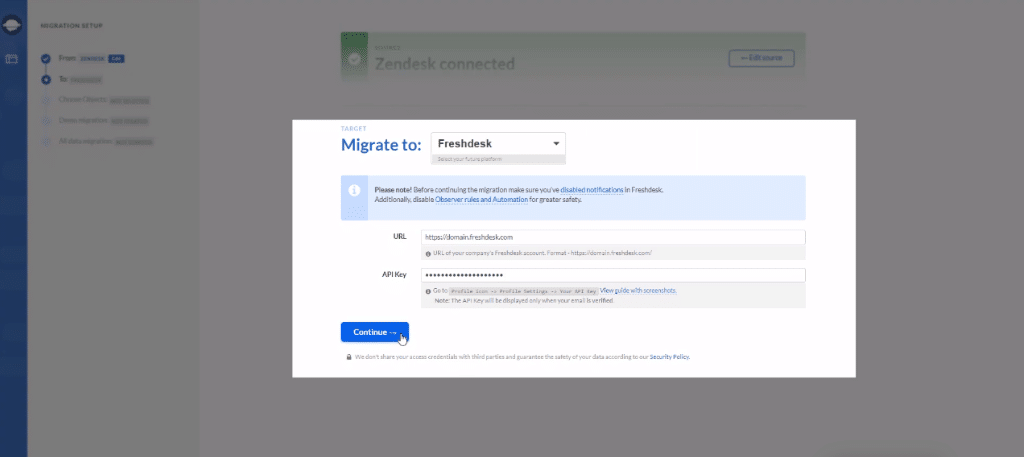
- Disable the notifications in the target platform.
- Additionally, disable the Observer rules and automation for additional security.
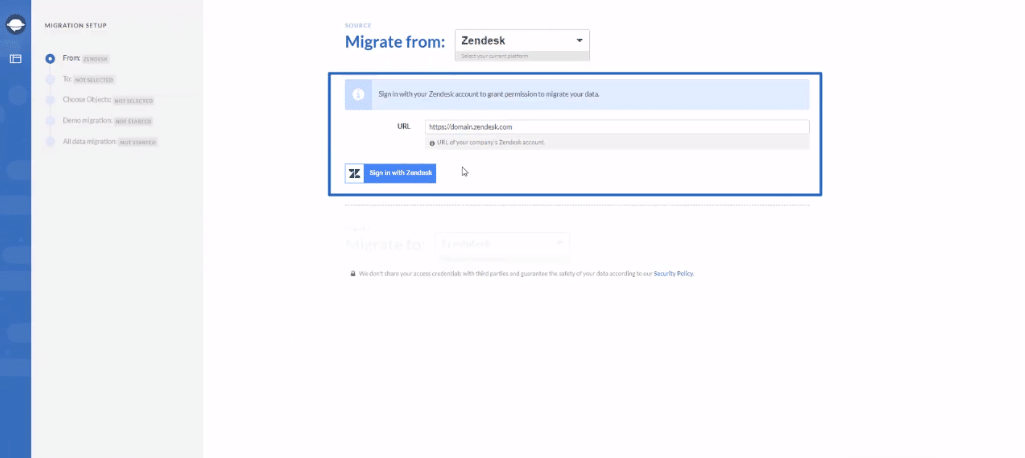
Step 1: First, you need to connect your Freshdesk and Zendesk accounts by authorizing your credentials. To do this, select the source platform as Freshdesk and sign in with your login credentials.
Step 2: Next, connect the target platform – Zendesk, and click on ‘Continue’.
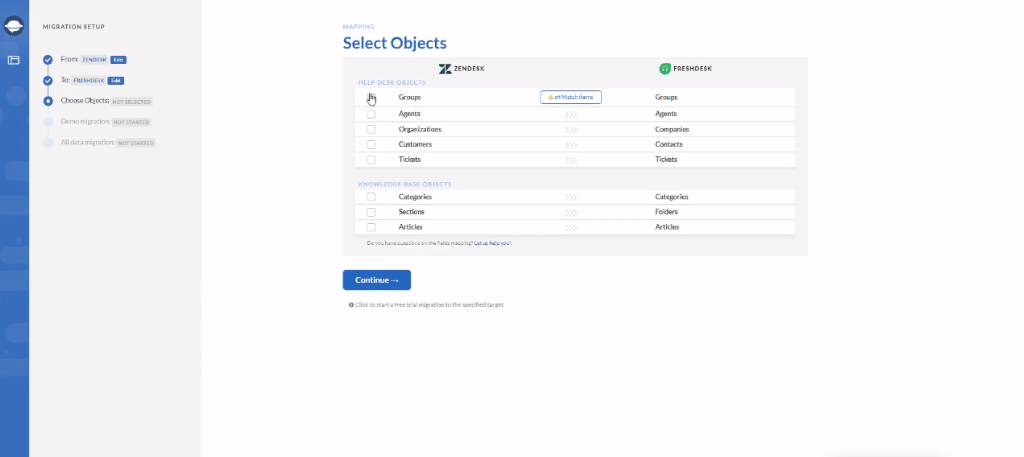
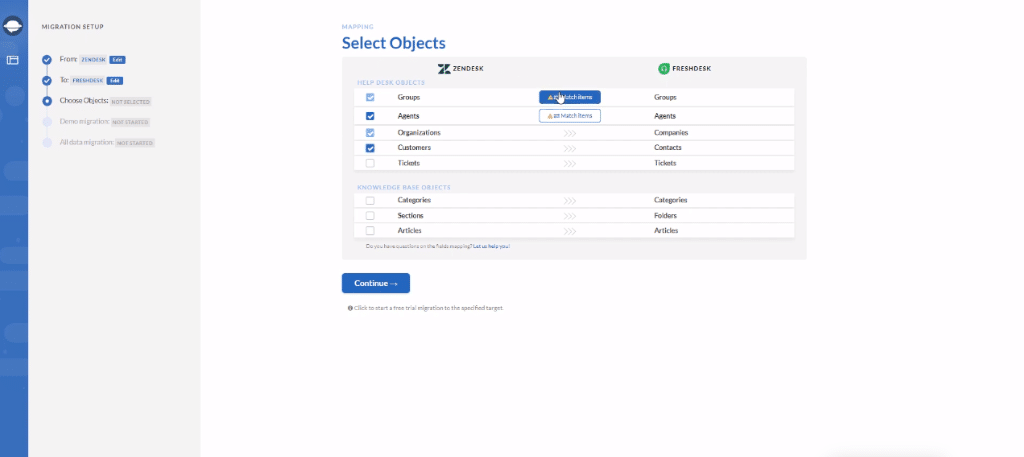
Step 3: In the next screen of Mapping Select Objects, select the helpdesk objects that you want to migrate from Freshdesk to Zendesk.
Step 4: Press on ‘Add Match items’ to match group fields on both the helpdesks.
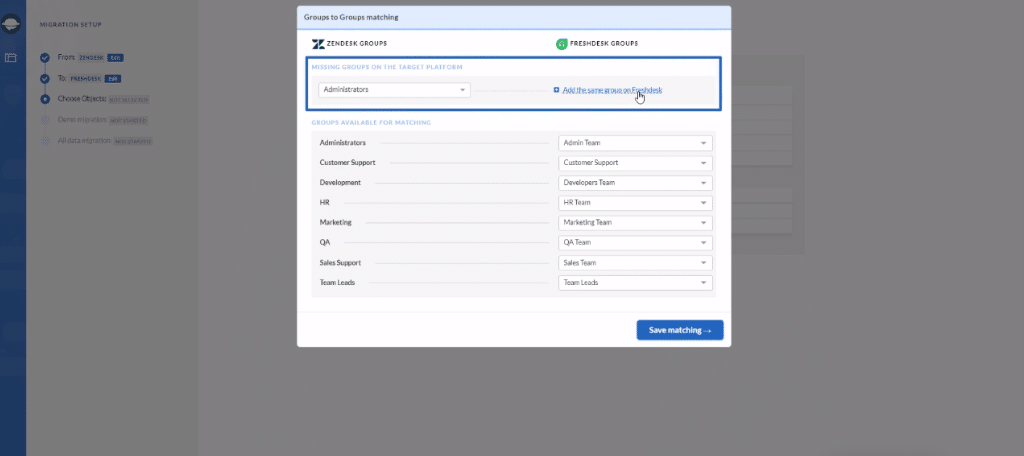
Step 5: If you want to create the same group on the target platform, then select ‘Add the same group on Zendesk’. And click on ‘Save Matching’ at the bottom of the window. Follow the same step to map the agent group.
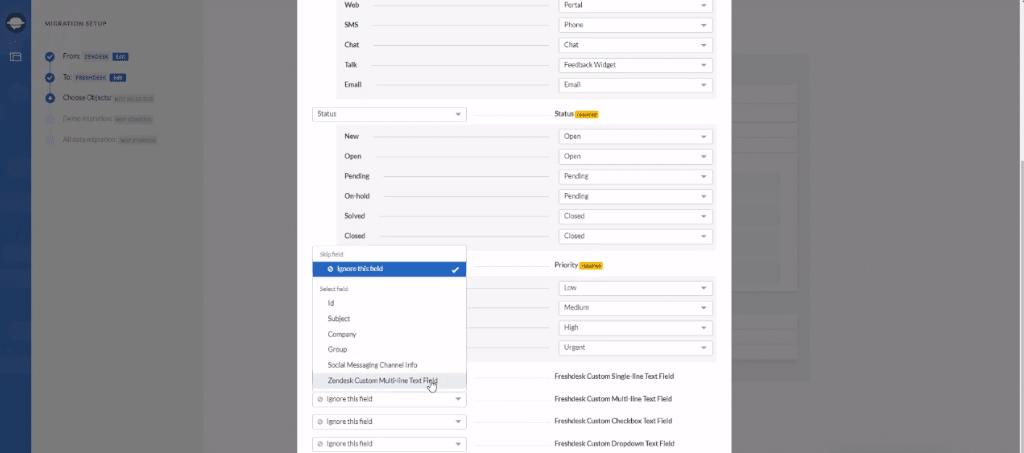
Step 6: On clicking the ‘Save Matching’ in the agents’ group window, it takes you to the ‘Select Objects’ window, click on ‘Tickets’. This will pop up the next window where you can select and map the ticket fields. Here, you can find both the in-built and custom fields available to map.
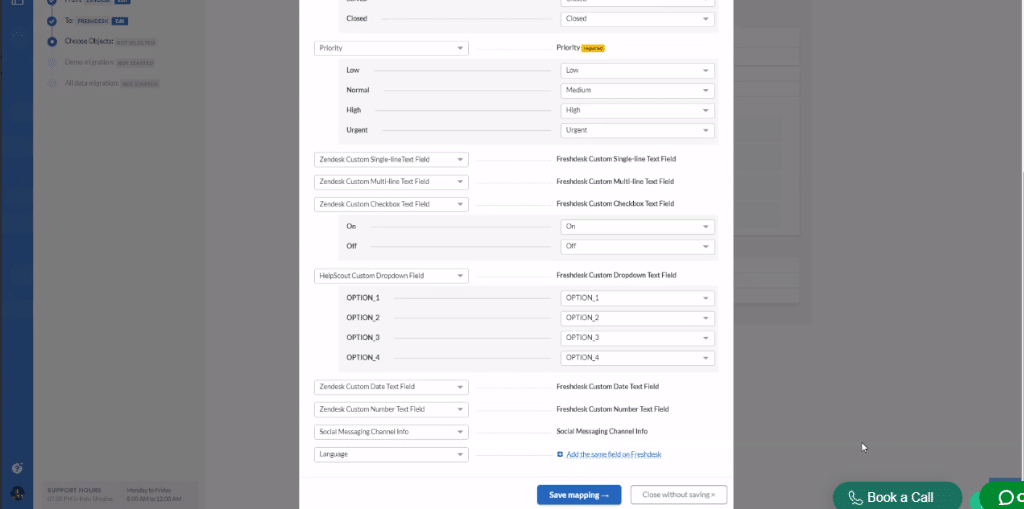
Step 7: Just like earlier, you can create the same ticket field on Zendesk by clicking on ‘Add the same field on Zendesk’. Finally, click on the ‘Save Mapping’ button.
Step 8: Moving on to map the knowledge base objects. For this, click and select the knowledge base objects.
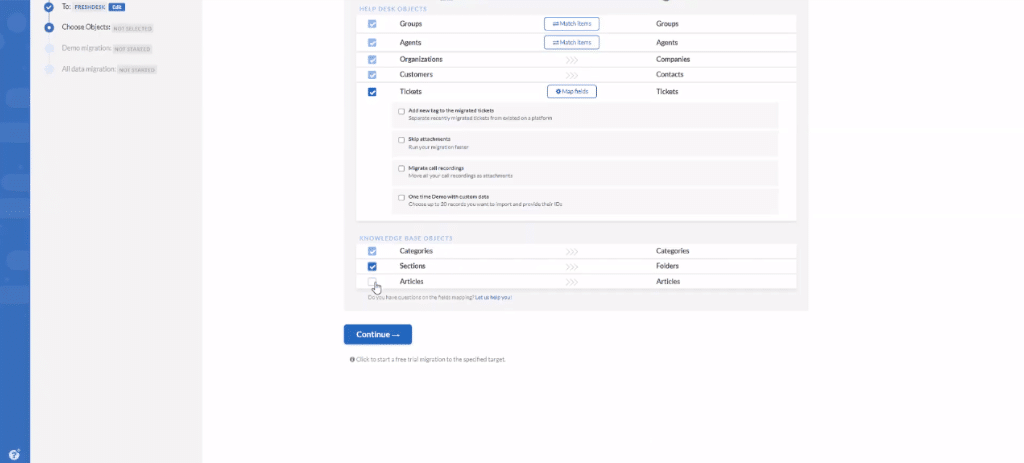
Step 9: Map the article fields and tap ‘Save Mapping’.
Step 10: Some custom mapping features like ‘Add new tags’, ‘Skip attachments’, ‘Migrate call recordings’, and ‘One time Demo with custom data’ are possible from the ‘Select Objects’ window itself. Select all your preferences and tap on the ‘Continue’ button.
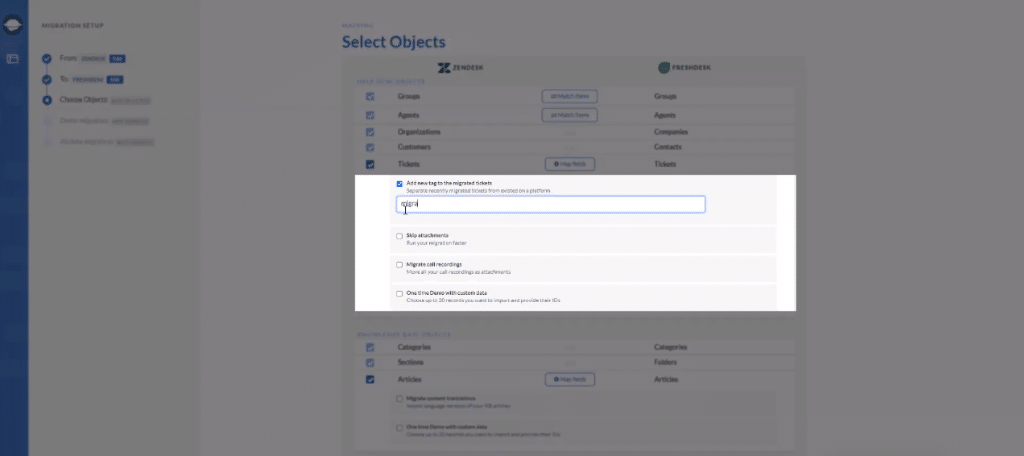
Though it is an option, checking a free demo to preview how the records will look post-migration would give you a clear picture of the migration.
There you are! If you are happy with the results, then carry on with the full migration of the data. You are now all set to export from Freshdesk to Zendesk automatically. Though this method will save you time and resources, Freshdesk assures you that it will not affect the quality.
Now, we will next see the custom method of migration.
Custom Method Of Freshdesk Data Migration To Zendesk
Does your Freshdesk to Zendesk migration have complex and unique requirements? Need not worry. The Help Desk Migration expert support team will help you with the entire migration process.
Step 1: To start with the complex data migration, contact them. Share the data requirements with them to help you with the tailored export/import procedures.
Step 2: Because, in case of non-standard data structure, their technical expertise is required to adjust the data migration according to your business needs.
Step 3: Once that is done, you will get to view a demo of the data migration. Check and verify the look of the data.
Step 4: Continue to full migration if you are satisfied with the output. And done.
Setbacks of Migration From Freshdesk To Zendesk
Pricey application
Except for the free demo which comes with a strong limitation of only up to 20 data, this Help Desk Migration tool of Zendesk is quite expensive. There are different plans available though, to choose as per your data requirements.
Need to pay extra for any custom migration requirements, even if it is just a single field.
Technical glitches
Any incorrect data inputs or technical errors result in an incomplete migration process. You need to approach their support team to sort immediate assistance. Moreover, it does not give you any report on what went wrong or what was incorrect data.
Also, you will not get to view any status updates of the migration process. Wait until the whole transfer is complete and then get the results on the window. This is in a way annoying as it would be helpful if you can view the status to enable you to concentrate on other tasks.
User Reviews
“Our situation seemed unique where we were looking to migrate articles that met specific criteria. It was unfortunate that it was an extra cost to get this filter criteria added to the migration.” – says a Salesforce CRM Manager.
“The amount of time we had to actual do the migration once we paid was not clearly indicated and had to ask for more time after our migration period expired (30 days) to not be charged again.” – user, mid-market business.
“The only con was that during the final live migration, the tool got stuck twice on bad data, and their support (who responded quickly to help) had to do something to fix. It would be good if the tool could skip these bad records and keep going, and then spit out a report at the end of what was missed.” – an online media support engineer.
“The progress page during the migration did not offer a lot of status updates on the number of records processed as it was happening, but when complete our tickets were all in place on the new instance.” – an omnichannel operations manager.
Meet Saufter, Best For Data Migration

Saufter thoroughly understands your eCommerce business needs and so boasts the following tools and features to help you provide the best customer support experience.
- Migration tool: First and foremost, we would like to highlight the fact that Saufter seamlessly integrates with Freshdesk in just a few clicks. Hence, the data migration is also simpler. Most importantly, you need not pay anything extra for custom migration purposes.
Additionally, check below for the other beneficial features of this helpdesk software.
- Helpdesk features: Optimizes your omnichannel support system through intelligent ticketing tools. Helps you manage unlimited tickets from across channels through seamless workflows.
- Self-help center: Live chat, chatbot integrations, and knowledge base together enhance your customer self-help center and deliver effective fast resolutions.
- Proactive support: eCommerce support automation tools monitor 24/7 and notify you of any order-related issues to extend necessary support to your customers even before they are aware of the situation.
- Native Integration: Integrates with eCommerce (Shopify, Woocommerce, and Magento), email, chat, SMS, and social media (Facebook, Instagram, Whatsapp, etc)
- Marketing Automation: Marketing pipeline tools help you with user review collection and showcasing on social media platforms. Connects you with suitable Influencers if you want to collaborate with them.
Did we miss any? Check it out here for yourself.
Last Words
This is the end of the step-by-step guide to migrating from Freshdesk to Zendesk. By now, we are pretty sure that you have understood that you need to invest in extra tools for migration purposes.
Why settle for something that demands more spending out of your pocket? Instead, make a wise choice by subscribing to an all-rounder helpdesk software like Saufter. Oh! We forgot to bring to your notice the key aspect earlier, ‘the pricing’. Saufter is affordable for businesses of all sizes, from startups to small to medium enterprises.
Adding to that, you have the flexibility of choosing the number of users from 3 to 50 as per your business requirements.
So, why wait?
