Last Updated: January 2026
If you’re looking to boost your Shopify store’s revenue and offer your customers a seamless subscription experience, then “Shopify ReCharge” is the solution you’ve been searching for.
In this comprehensive guide, we’ll walk you through the step-by-step process of adding ReCharge subscriptions to your Shopify store.
Whether you sell physical products, digital downloads, or services, integrating ReCharge can help you create a steady stream of recurring revenue while enhancing customer loyalty. So, get ready to unlock the potential of subscription commerce with Shopify ReCharge – let’s dive in!
Benefits of adding Shopify ReCharge to your store
ReCharge offers a robust solution tailored to Shopify merchants, and here are the primary advantages of adding Shopify recharge to your Shopify store:
- Recurring Revenue: Ensure a steady stream of income as customers subscribe to your products or services regularly, reducing revenue fluctuations.
- Enhanced Customer Loyalty: Subscribers tend to be more loyal, leading to higher retention rates and reduced customer churn.
- Automated Billing: Streamline billing processes with automated subscription management, saving time and reducing errors.
- Upselling Opportunities: Cross-sell and upsell to subscribers, increasing average order values and maximizing revenue per customer.
- Improved Customer Experience: Offer a seamless shopping experience with user-friendly subscription management, leading to higher customer satisfaction.
Steps to add Shopify ReCharge to your store
ReCharge enables you to establish recurring billing options for your Shopify products. During the checkout process, a dedicated ReCharge page will be presented to facilitate payments.
Both Shopify and ReCharge will independently handle and oversee customer accounts, ensuring seamless management and control.
Now, let’s explore the process of configuring Recharge Payment for your Shopify store.
1) Incorporate the ReCharge inclusion on the product page
In your theme files, navigate to the file in which the product form initiation occurs.
product.liquid, product-form.liquid, or product-detail.liquid.

Typically identified as locating the form tag with an action attribute set to /cart/add. Refer to this example:
<form id=”add-item-form” action=”/cart/add” method=”post”><br>
Insert the code immediately beneath the form line:
{% if product.available %}{% include ‘subscription-product’ %}{% endif %}

2) Embed code within the product page’s form
Input the provided code: data-productid=”{{product.id}}” into the form tag, ensuring that the outcome resembles the following:
<form id=”add-item-form” action=”/cart/add” method=”post” data-productid=”{{product.id}}”>
Within the product.liquid file, locate a select/ an input element with the attribute name=”id.”
For instance:
<select id=”product-select-{{ product.id }}” name=’id’><br>
<input type=”hidden” name=”id” value=”{{ product.variants.first.id }}” />
Include data-productid=”{{product.id}}” to all instances you can identify. The final result should closely resemble this:
<select id=”product-select-{{ product.id }}” name=’id’ data-productid=”{{product.id}}”><br>
<input type=”hidden” name=”id” value=”{{ product.variants.first.id }}” data-productid=”{{product.id}}” /><br>
3) Integrate the ReCharge Inclusion into the Cart Page
Access the cart.liquid file, and insert the provided code at the file’s beginning:
{% include ‘subscription-cart-footer’ %}
It’s essential to conceal any extra checkout buttons present on your cart page. To achieve this, locate the following IF statement:
{% if additional_checkout_buttons %}
….. THEME CODE ……
{% endif %}
Insert a tag with the attribute class=”additional-checkout-buttons.” This action will yield the following outcome:
{% if additional_checkout_buttons %}
<span class=”additional-checkout-buttons”>
<div id=”additional-checkout-buttons”>
<span>{{ ‘cart.label.other_payment_types’ | t }}</span>
{{ content_for_additional_checkout_buttons }}
</div>
</span>
{% endif %}<br>
4) Integrate the Shopify ReCharge inclusion into the theme.liquid
Access your theme.liquid file and scroll down to the page’s bottom.
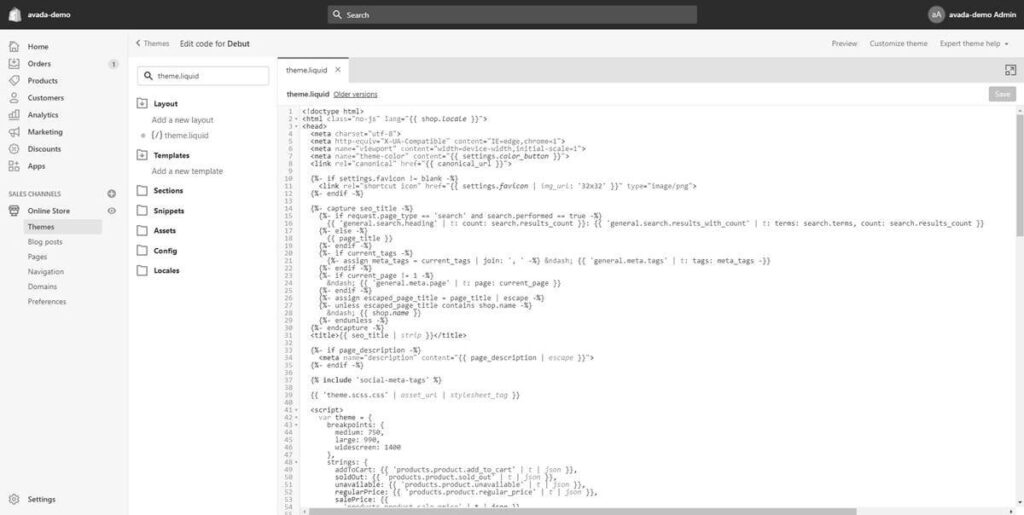
Insert the subsequent line right before the closing body tag:
{% include ‘subscription-theme-footer’ %}
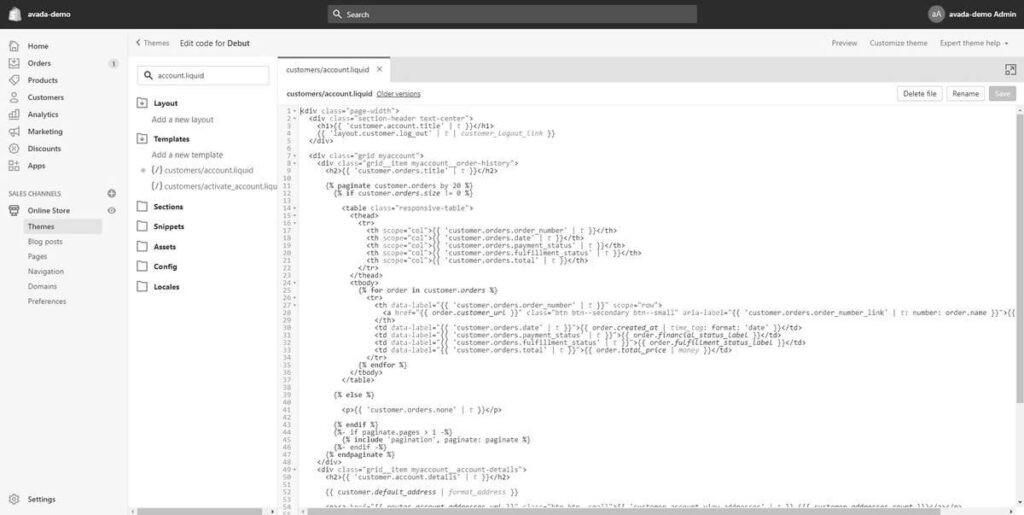
5) Adding the Shopify ReCharge code to customers/account.liquid
Access the customer template titled account.liquid using the Shopify Theme editor.
{% if customer.metafields.subscriptions.customer_string %}
<!–BeginRechargeCode–>
<p><a href=”/tools/recurring/customer/{{customer.metafields.subscriptions.customer_string}}/subscriptions/”>Manage Subscriptions</a></p>
<!–EndRechargeCode–>
{% endif %}<br>
Customers can access the Customer Portal directly from their accounts using this code. The link is visible exclusively to customers who purchase a subscription product.
6) Incorporate the ReCharge code into ajax-cart-template.liquid
If your theme lacks a snippet named ajax-cart-template.liquid, you can disregard this step. However, if this file exists, you must navigate to it and insert the following code at the file’s conclusion:
<style>
#AjaxifyCart .additional-checkout-buttons, #ajaxifyCart .additional-checkout-buttons {
display:none;
}
</style>
{% if template != ‘cart’ %}
<script src=’//ajax.googleapis.com/ajax/libs/jquery/1.7.2/jquery.min.js’></script>
<script>
rjQuery = jQuery.noConflict( true );
var subscription_active='{{shop.metafields.subscriptions.subscription_active}}’
function get_cookie(k){return(document.cookie.match(‘(^|; )’+k+’=([^;]*)’)||0)[2]}
if (get_cookie(‘recharge’)==’true’ || subscription_active==’true’) {
rjQuery(‘body’).on(‘click’,’form[action=”/checkout”] input[type=”submit”], #ajaxifyCart [name=”checkout”], #AjaxifyCart [name=”checkout”], #shoppingBagInner [name=”checkout”]’, function(e){
e.preventDefault();
window.location.href = ‘/cart’;
})
rjQuery(‘.additional-checkout-buttons’).hide()
rjQuery(document).ready(function(){
rjQuery(‘.additional-checkout-buttons’).hide()
})
}
</script>
{% endif %}<br>
7) Include a product in your subscription
You have the option to add a product to either a new or existing order to thoroughly test the integration and verify its successful installation. Additional products can be added at your convenience.
8) Preview the Application on Your Store
Alter the product’s URL by appending “?recharge=1” to the end. This adjustment will allow you to preview the subscription option.
Follow these steps to add ReCharge to your Shopify store and don’t forget to run a test transaction before going live.
Additionally, if you wish to have streamlined customer support for your Shopify store, take a look at Saufter.
Need a single view for all support tickets?
Introducing Saufter, a groundbreaking platform that stands ready to revolutionize your e-commerce operations, elevate your customer service, and propel your business to success!
Key features
- Efficient Automation: Utilizes AI-driven automation, continually adapting based on each customer interaction to provide tailored responses to individual preferences and questions.
- Simplified Ticket Management: The centralized ticketing system efficiently arranges and prioritizes customer inquiries.
- Unified view: Access a singular, organized view of each customer’s journey and all support inquiries, without clutter or confusion.
- Enhanced Self-Help Capability: A robust knowledge base empowers your customers to independently find solutions to their questions.
- AI-Enhanced Chatbots: Engage with customers in real time, handle routine inquiries, and smoothly escalate complex issues to human agents as needed.
- Informative Analytics: Provides actionable insights into customer behavior, allowing you to refine your support strategies and enhance the overall customer experience.
- Seamless Integration: Effortlessly incorporate Saufter into your current tools and systems, creating a unified support environment.
Final thoughts
In conclusion, integrating Shopify ReCharge Subscriptions into your store is a transformative step that promises to revolutionize your e-commerce venture.
By automating billing, enhancing customer loyalty, and offering flexible subscription options, you’ll secure a steady stream of recurring revenue.
With the ability to upsell, cross-sell, and gain invaluable insights into customer preferences, ReCharge empowers your business to thrive in the competitive e-commerce landscape.
Furthermore, if you aim to enhance your customer service, Saufter is a noteworthy option. Serving as a comprehensive solution, Saufter excels in improving and streamlining customer support processes.
Moreover, it offers self-service portals and automated workflows, empowering your customers while reducing the workload on your team. Ready to get started? Don’t hesitate; sign up today for a 15-day free trial!


